
用 GitHub Actions 解决 Dokploy 部署卡死问题
从 Vercel 到自建 VPS,再到使用 GitHub Actions 优化 Dokploy 部署流程的完整实践经验分享
背景:从 Vercel 到自建 VPS 的选择
我之前测过把项目部署到 Vercel 和自己的 VPS 的 Dokploy 上,结果发现自己 VPS 上的项目访问起来要快不少,可能是由于我是免费 Vercel 的原因吧,再加上流量大之后收费贵,所以我放弃了,同时也放弃了 Linode。我之前写过两篇文章讲了这个情况:
遇到的问题:Dokploy 部署卡死
然后不知道是不是项目有点多了,或者机器配置不够了,我发现最近 Dokploy 自动部署项目的时候会出现卡死重启的现象:
以上是 Dokploy 自动发送消息到我的 Discord 频道。
这样的话每次部署都要卡一下,肯定不是我们做出海网站想看到的,于是我去搜一下,发现都建议使用 GitHub Actions 去部署,然后我们的 Dokploy 直接拉取镜像就行了。
我根本不知道 GitHub Actions 是什么东西,之前也没用过,不过这不影响我们现在来使用,于是下面这些步骤是我昨天晚上,哦不,是凌晨摸索出来的,也可以说是借鉴出来的。
解决方案:GitHub Actions + Dokploy
步骤1:创建 GitHub Actions 工作流
首先到咱们的 GitHub 仓库上方的 Actions 里面新建一个 workflow:
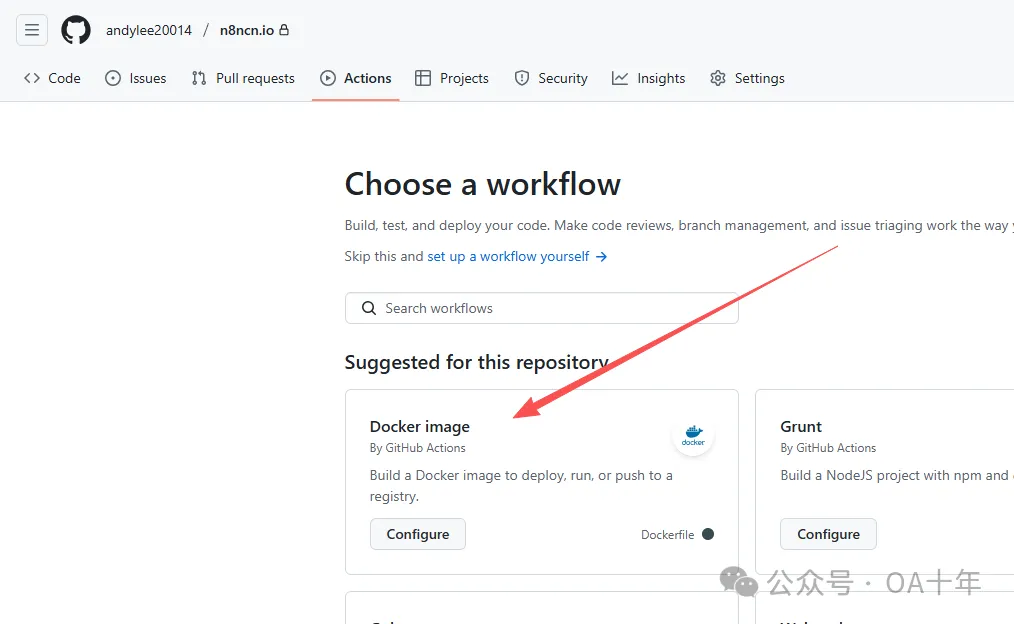
我直接选择排第一的 Docker image,然后把下面的内容复制进去:
# https://docs.github.com/zh/actions/use-cases-and-examples/publishing-packages/publishing-docker-images
name: Create and publish a Docker image
# Configures this workflow to run every time a change is pushed to the branch called `release`.
on:
push:
branches: ['main']
# Defines two custom environment variables for the workflow. These are used for the Container registry domain, and a name for the Docker image that this workflow builds.
env:
REGISTRY: ghcr.io
IMAGE_NAME: ${{ github.repository }}
# There is a single job in this workflow. It's configured to run on the latest available version of Ubuntu.
jobs:
build-and-push-image:
runs-on: ubuntu-latest
# Sets the permissions granted to the `GITHUB_TOKEN` for the actions in this job.
permissions:
contents: read
packages: write
attestations: write
id-token: write
#
steps:
- name: Checkout repository
uses: actions/checkout@v4
# Uses the `docker/login-action` action to log in to the Container registry registry using the account and password that will publish the packages. Once published, the packages are scoped to the account defined here.
- name: Log in to the Container registry
uses: docker/login-action@65b78e6e13532edd9afa3aa52ac7964289d1a9c1
with:
registry: ${{ env.REGISTRY }}
username: ${{ github.actor }}
password: ${{ secrets.GITHUB_TOKEN }}
# This step uses [docker/metadata-action](https://github.com/docker/metadata-action#about) to extract tags and labels that will be applied to the specified image. The `id` "meta" allows the output of this step to be referenced in a subsequent step. The `images` value provides the base name for the tags and labels.
- name: Extract metadata (tags, labels) for Docker
id: meta
uses: docker/metadata-action@9ec57ed1fcdbf14dcef7dfbe97b2010124a938b7
with:
images: ${{ env.REGISTRY }}/${{ env.IMAGE_NAME }}
# This step uses the `docker/build-push-action` action to build the image, based on your repository's `Dockerfile`. If the build succeeds, it pushes the image to GitHub Packages.
# It uses the `context` parameter to define the build's context as the set of files located in the specified path. For more information, see "[Usage](https://github.com/docker/build-push-action#usage)" in the README of the `docker/build-push-action` repository.
# It uses the `tags` and `labels` parameters to tag and label the image with the output from the "meta" step.
- name: Build and push Docker image
id: push
uses: docker/build-push-action@f2a1d5e99d037542a71f64918e516c093c6f3fc4
with:
context: .
push: true
tags: ${{ steps.meta.outputs.tags }}
labels: ${{ steps.meta.outputs.labels }}
# This step generates an artifact attestation for the image, which is an unforgeable statement about where and how it was built. It increases supply chain security for people who consume the image. For more information, see "[AUTOTITLE](/actions/security-guides/using-artifact-attestations-to-establish-provenance-for-builds)."
# - name: Generate artifact attestation
# uses: actions/attest-build-provenance@v1
# with:
# subject-name: ${{ env.REGISTRY }}/${{ env.IMAGE_NAME}}
# subject-digest: ${{ steps.push.outputs.digest }}
# push-to-registry: true
# Trigger redeploy on dokploy => project webhooks settings
- name: Trigger dokploy redeploy
run: |
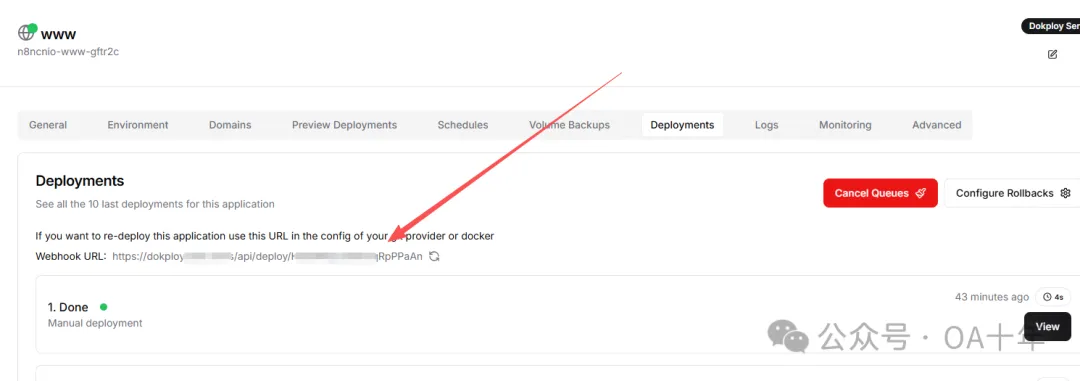
curl -X GET https://dokploy.xxx.com/api/deploy/xxxxxxxx只需要把最后一行的链接 https://dokploy.xxx.com/api/deploy/xxxxxxxx 改成 Dokploy 项目 Deployments 里面的 Webhook URL 就行了:
然后把这个 workflow 保存,你的项目里面就会多一个文件 .github/workflows/docker-image.yml
步骤2:配置 Dokploy Docker Registry
好了现在我们有 Actions 了,库这边搞定了,咱们再去 Dokploy 那边做一点设置。
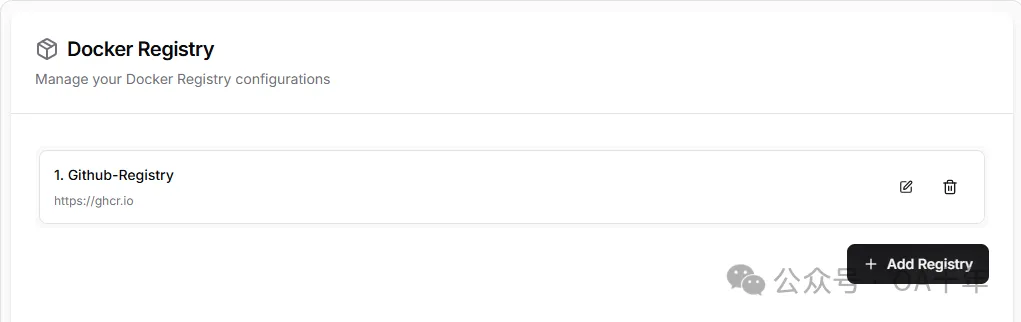
首先就是添加 Docker Registry:
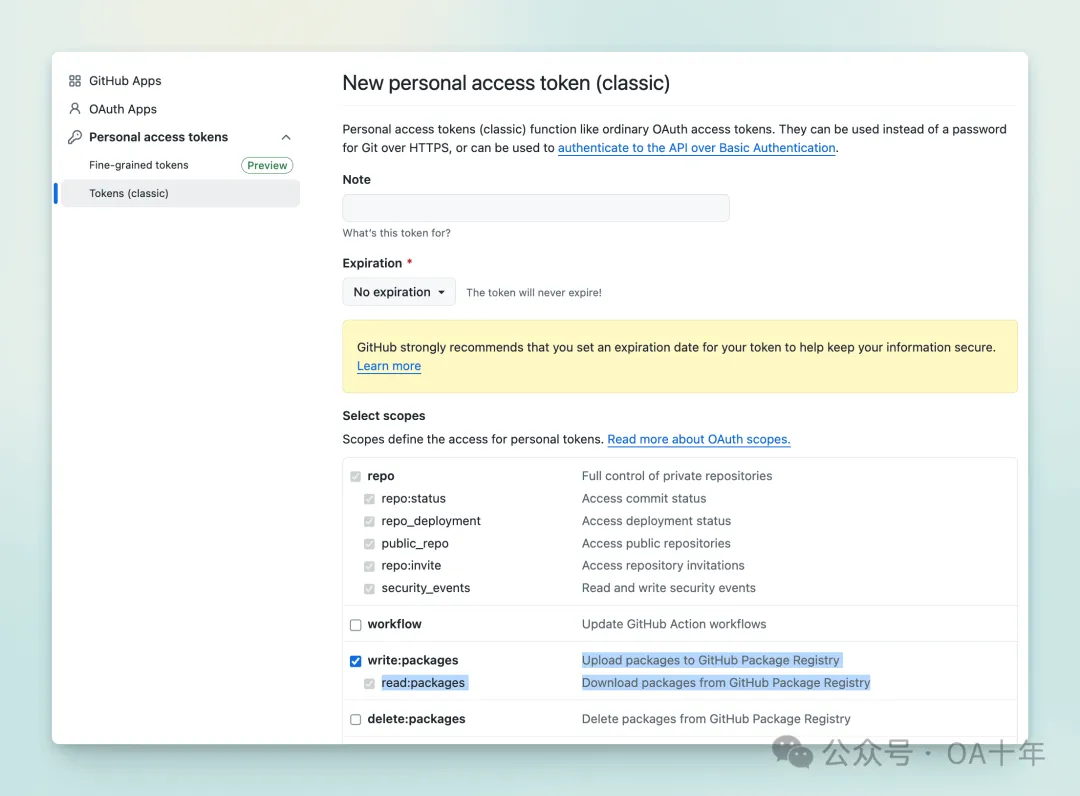
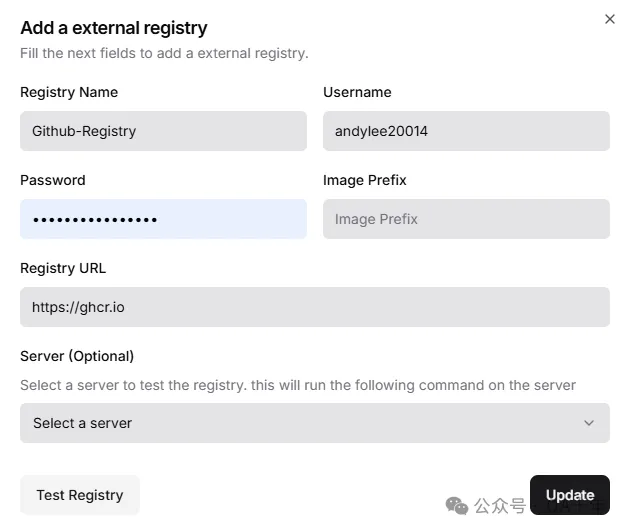
添加之前首先要创建一个 GitHub Token,这个 Token 需要有权限拉取你上传到 GitHub 镜像注册中心的镜像,你可以在 https://github.com/settings/tokens/new 创建一个 Token,勾选如下图所示的 write 权限就行:
在 Dokploy 的 Docker Registry 配置中,新建一个外部 Registry,Username 是你的 GitHub 账号名,Password 是上面创建的 Token,URL 是 https://ghcr.io 。
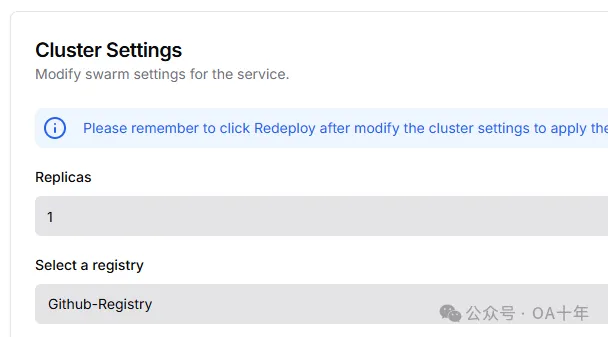
步骤3:配置应用部署方式
然后重新配置部署方式,这次我们换成 Docker 的部署方式。首先在应用的高级设置中,设置 Registry 是我们刚才创建的 Registry。
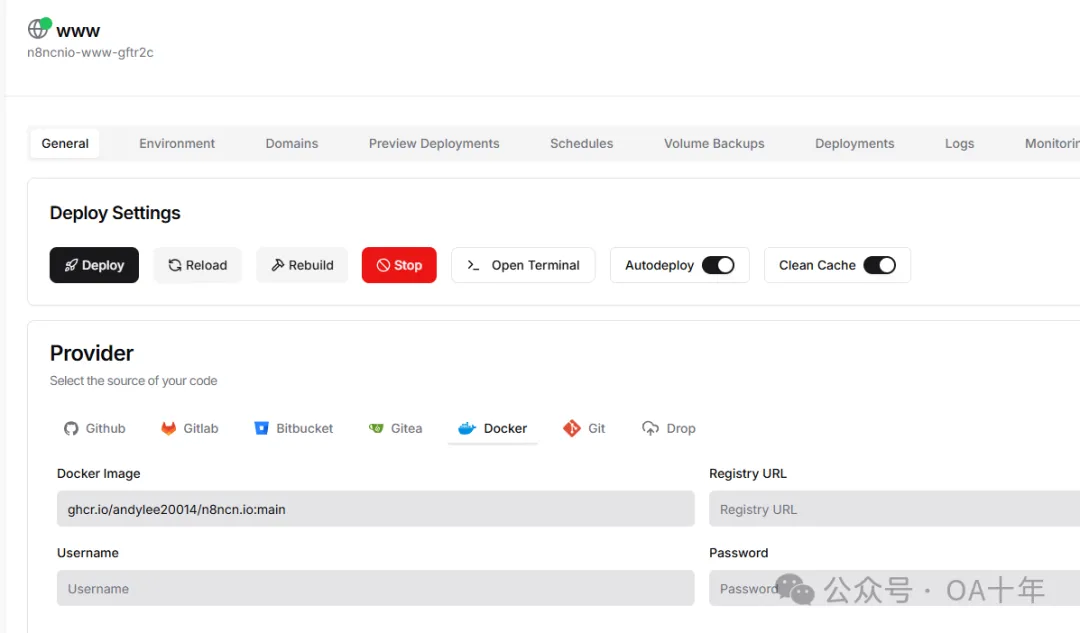
然后,配置部署参数,Docker Image 是 ghcr.io/[Github账号名]/[Repository项目名]:[分支名] ,比如我的就是 ghcr.io/andylee20014/n8ncn.io:main,然后保存。意思是,部署时,Dokploy 去 Registry 中找到这个 Docker 镜像,把最新镜像拉取下来并部署上线。
步骤4:环境变量处理
OK,到现在就搞定了,当我们提交代码到 main 分支的时候,workflow 会自动执行,构建镜像并 push 到 GitHub 镜像中心。
如果没有环境变量的项目,是可以了。不过如果你的项目中有环境变量,就会发现 GitHub Actions 部署出错,这是因为我们没有把环境变量传到库中。
现在有两个办法,一个是直接在库后台的 Environments 一个个填写:
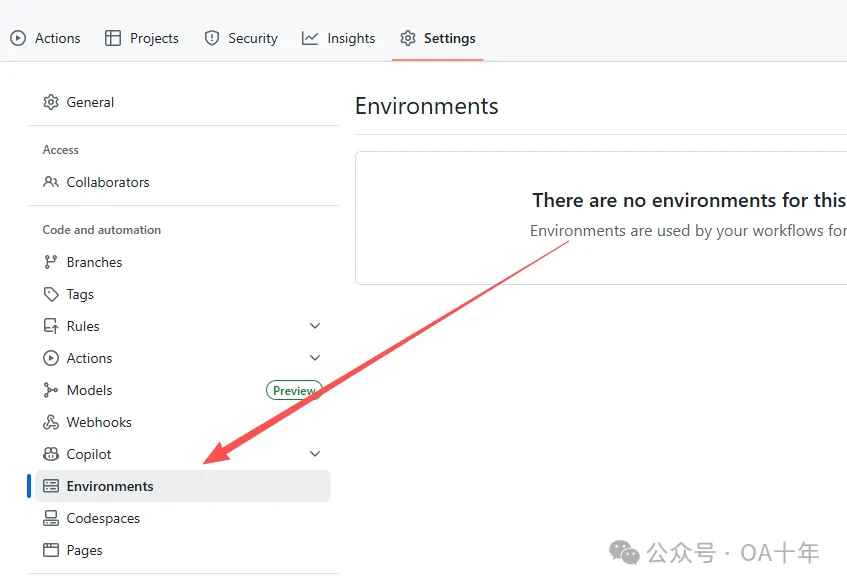
和 Vercel 不一样的是,Vercel 环境变量可以直接全部复制粘贴就会自动识别,但是 GitHub 这个就要一个个填写,比较麻烦,特别是我们的环境变量有 20 多个。
那怎么办呢,我咨询了 Fox,找到一个新办法,那就是直接把 .env.production 带进仓库,就这么简单。
反正是新项目,个人项目,怎么方便怎么来,怎么快怎么来,后面项目流量起来了再处理都行。
所以最后一步(仅针对我个人),直接把变量全部复制到 .env.production,然后到 .gitignore 里面去掉 .env.production 即可。
总结
通过使用 GitHub Actions + Dokploy 的组合方案,我成功解决了 Dokploy 部署时卡死重启的问题。这种方案的优势:
- ✅ 稳定性提升:构建过程不再占用 VPS 资源
- ✅ 部署速度快:GitHub Actions 的构建速度比本地快
- ✅ 自动化程度高:推送代码即触发部署
- ✅ 成本优化:充分利用 GitHub 免费额度
对于个人项目和中小型项目来说,这是一个非常实用的解决方案。
更多文章

从想法到上架:我的AI图像生成Chrome插件开发全记录
详细记录为FreeAiGen.com开发Chrome插件的全过程,从构思设计到审核上架,分享开发经验和心得体会。


AI辅助开发桌面录屏工具:从网页版到exe程序的完整实战
分享使用Cursor和AI开发Windows桌面录屏工具的完整过程,包括技术选型、开发流程、Cloudflare部署方案,以及非程序员如何借助AI实现复杂功能。

从年入一百万到负债一百万,我都经历了什么?
如果要用四个字形容2024年,那就是"大起大落"。从OA暴富到Web3爆仓,从开滴滴到转型AI,这一年经历的比前几年加起来还多...一个普通人的真实创业血泪史。

TikTok域名争议案最终结果:败诉!完整复盘与经验分享
TikTok域名争议案件的最终裁决结果出炉,详细复盘整个过程,分享域名注册的法律风险和避坑指南。